| Glorious Wiki readers. We are adding the Midnight Magic video and livestream to the wiki. We appreciate your patience as we process the new and updated information! |
技能點

What you're seeing at a high level here is just what you'd pretty much expect of a traditional skill. We're doing something a little more advanced than just like a bottom up structure, because we're being a little bit more free-form in this iteration. This will obviously see more UI iterations in the future, but you'll see a mix of active and passive abilities here. Actives are indicated by their square shape, while the circular ones are representing passives; and one thing to note as well is that these passives are aiming to be a little more interesting than just like, this ability does more damage now, or it has a lower cooldown. We do have some of those too, but the goal with a lot of these passives in addition to that is to allow people to lean into unique play styles. So you'll notice that some of them are are changing your gameplay in meaningful ways; and that's the direction we want to take um player and character customization as a whole.[1] – Tradd Thompson
Players receive skill points at specific points as they level.[2] These can be used to level up skills (increase their rank) within their active, passive or combat/weapon skill trees.[3][4][5][6]
- Making active skills capable of receiving additional skill point allocations and unlocking additional features so that from a player agency standpoint it's going to be up to you whether or not you want to be more diverse but less depth- wider and not taller, in some of these skill choices. Or if you want to be very very tall, that's going to be something that is up to the player in that regard.[7] – Steven Sharif
- Skill points will accrue at specific XP milestones, such as 1/4, 1/2, 3/4 progress through the level, so as to avoid creating an imbalance with experience debt.[2]
- We do have this concept of experience debt that does accrue and we don't want to create an imbalance between skill points acquired versus experience, so we're going to predicate your skill points acquisition based on benchmarks you reach when leveling through a level. So these are going to be at specific points in the level, like one quarter progress, to half progress, to three quarters progress: you're going to get an influx of skill points and then you'll be able to allocate them into your skill tree.[2] – Steven Sharif
- Skill points can be used to unlock universal skills at the expense of unlocking class-specific skills.[8]
- Respeccing (resetting and reallocating) adventuring skills may require travelling to a specific location rather than being able to be done on-the-fly.[9][10]
- Augments do not cost skill points.[11] It was previously stated that certain augments will have more expense required on the skill point side.[12]
| 以下某些信息最近尚未得到開發人員的確認,可能不在當前的開發路線圖上。 |
- It will not be possible to max all skills in a skill tree.[6]
- In terms of skill progression, players can choose to go "wide" and get a number of different abilities, or go "deep" into a few specific abilities.[13]
主要技能

If from the eight archetypes whatever you choose as your secondary, you're going to receive a choice of augments that relate to some core ideal of that class. You know like a tank is about controlling the battlefield, is about surviving. The mage is about dealing damage and elements and ability in AoEs. The rogue is going to be about stealth and critical damage. So those augments are going to to play towards those identities.[15] – Steven Sharif
The idea behind the system is that you're skirting the line through these augmentations of your role, right. We have the traditional holy trinity that's present in class designs for MMOs and it's often that those either are not deviated at all or completely deviated from entirely. The augment is to offer a balance between that where you still maintain the semblance of that trinity system while offering the opportunity to customize your play experience towards one of the other angles in the triangle.[16] – Steven Sharif
主要技能 (class abilities) are based on a player's archetype.[17][18]
- A player may choose a secondary archetype when they reach level 25.[19][20] The player can then augment their primary skills with effects from their secondary archetype.[17][19][20][18][21]
- Outside of class-specific skills there may be a subset of universal skills, such as active block and dodge.[22]
- Class skills are not affected by the type of weapon that is equipped.[23]
主動技能

- 可以放在技能欄中的技能數量有限 (少於30)。[28]
- 將有選項添加多個技能欄。[7][27]
- 例如一個鬥士將會因為選擇了不同主動技能,而與其他鬥士不同。[28]
- 透過選擇不同技能,玩家可以專注於Tab 鍵鎖定技能、動作指向技能或兩者混合,塑造自己的戰鬥體驗。[29]
- 角色升級時不會習得新技能,玩家需要自行選擇想要習得的技能。[13]
- 技能數量不會多得令人措手不及。[30]
There will be multiple hot-bars that you obviously have available, because you're going to have consumables, you're going to have active skills and whatnot. But the number of active skills are not going to overwhelm necessarily the character and be irrelevant especially at certain stages.[7] – Steven Sharif
Respeccing skills
Respeccing (resetting and reallocating) adventuring skills may require travelling to a specific location rather than being able to be done on-the-fly.[9][10]
- I am still conflicted on whether or not I want to allow respecs on-the-fly. I believe that respecing should be done at a particular location that requires a bit of transit and some strategic thinking ahead of time about the encounters that you're expecting, but respecing your class should be relatively easier obviously with that constraint of being at a particular location.[9] – Steven Sharif
- Swapping between multiple saved specs may be able to be done after a suitable cooldown period.[31][32]
- Respeccing artisan skills is going to be more difficult than respeccing adventuring skills.[9]
職業成長
若一名鬥士選擇法師為副原型,其將變成 Spellsword. 組合原型後,玩家可以將主技能樹的技能增強。鬥士的衝鋒能讓他們衝向敵人,對其造成傷害並有機會擊倒敵人。而法師的逃脫增強可以應用於衝鋒,讓衝鋒變成將玩家傳送到目標的位置,移除了本來向敵人衝鋒所需的時間。[18]
世界事件不會直接影響職業的效能,但將可能有一些附帶影響,例如裝備、附魔和紋身的供應。[39]
Universal skills
Universal skills, such as active blocking and dodge rolling, are able to be unlocked by all archetypes.[8][22]
- Outside of your class-specific skill tree, there's going to be a subsection of a few skills that are universal, like active block, like dodge; and I think what we're going to do- or at least what we're going to be discussing here- is those universal skills will have progressions that might align with your passive tree; and you can spec skill points into progressing additional features of those universal abilities that you will have access to. So I think that's probably going to be the direction that we're going to take.[22] – Steven Sharif
- Q: Will each archetype be equally efficient with universal skills, like dodging and active blocking, or will each of them have their own versions and flavors, or will some people be more powerful than others?
- A: We want to provide a progression path that's shared for those universal skills across all the archetypes. So when you spend skill points, you can choose to spend them within the universal skill set and unlock particular ability types for the universal skills as well, but you will be spending them from the skill points that you would normally spend within your class-specific skill tree; and this offers again a different wheel of customization that I think is interesting.[8] – Steven Sharif
- The developers will be testing the use of separate energy mechanics for universal skills in Alpha-2.[40]
- Universal skill progression may align with a player's passive skill tree.[22]
Weapon skills

The intent here is to give you choices. Either I want to extend and improve my combo, or I want just passive benefits that increase my attack speed or crit chance.[42] – Brian Ferguson
Weapon skills grant passive skills and proc effects and other status conditions, rather than usable skills on a player's action bar.[43] The more skill points that are allocated to the weapon tree, the greater a player's weapon familiarity. This influences things like the number of attacks, attack speed, and increased chances of proc effects from carrying out basic attacks with that weapon. These procs may offer synergy with the player's active skills.[44][45][46][43][47][48][49][50][51][52][4][5][53][37][54] This synergy also applies to active skills from other characters.[45][3]
- Weapon skill trees are skill trees that you can unlock and invest points into as you continue to develop your experience with certain weapon types, certain weapon groups, like a dagger; and when you're doing your basic combo attack with those weapons, which is universal for all classes- anybody can use any type of weapon because stats can be changed on these weapon types through crafting and through drops- there will be certain proc effects that live on the weapon skill tree as you advance in them; and those proc effect effects will be able to interact with your archetype skills because they will have promotion type effects that occur when they synergize with one another.[44] – Steven Sharif
- The weapon combo system determines special effects that proc based on weapon progression.[53][54]
- These procs may reduce or reset cooldowns on other skills on the player's hotbar.[55]
- Certain rotations can ensure the best chance of triggering a weapon proc, but there is no reliable way to ensure that proc activates.[56]
- 武器成長 such as set bonuses may change at what level any proc effects occur.[51]
- Our approach is not going to be providing skills through weapons. It's going to be providing skills through classes.[47] – Steven Sharif
- Players can spec into weapon skills on their weapon skill tree (also referred to as Combat skills[4], and Combat tree[5]) based on their preferred weapon types and the grade of the weapon.[48][49][50][52][5][4][53]
- Dual wielded weapons count as a single weapon type on the weapon skill tree.[56][57]
- Let's say a dagger has some slashing effects that bleed the target or that cripple the target... Every time you attack you have a chance to proc that effect. That effect then can synergize with what your active skills tree has available to it. So let's say your backstab deals 30 additional damage to a bleeding target. If you attack with your main weapon first and the target gets the bleed proc off and you do your backstab skill then you're synergizing your effects.[5] – Steven Sharif
- Let's say backstab that you can apply to deals damage to the target and it'll have a conditional modifier on that damage if you're behind the target, and it'll have a conditional modifier deal additional 50 damage if the target is under a bleed effect. So you want to synergize essentially your weapon proc conditions with your active skills so that you're timing your certain active skills appropriately with the status conditions that the target has taken.[4] – Steven Sharif
- Certain higher-end weapons (and 裝甲) have active abilities, but the intention is that these abilities will not radically redefine the way an archetype is played.[58]
武器成長

Power creep is a balance issue... When it comes to gear progression specifically, the idea is to create an open market that is not heavily dependent on soulbound items; and having many item sinks and gold sinks within that economy that allows for the potential degradation and loss of assets within that closed economy; and not introduce items from the market that companies put in from a pay-to-win perspective or from a pay-to-convenience perspective that undermines the economy that players have built. That is a huge mistake that companies have made in the past and that lends to the imbalancing of what designers maybe have actually balanced well.[60] – Steven Sharif
武器 have their own progression paths.[53][61]
- Each type of weapon has its own skill tree that grants passive skills and proc effects and other status conditions.[47][48][49][50][51][52][4][5][53][37][54]
- The weapon combo system determines special effects that proc based on weapon progression.[53][54]
- Ancillary effects proc based on enchantment types.[54]
- Gear enhancements (power stones) can be applied to add elemental or energy types of damage.[54]
- Dual wielded weapons will have its own progression based on weapon type.[62]
- Weapon proficiency (based on length of use of a weapon) is not a planned feature.[37]
- Ashes of Creation is all about providing many progression paths... The reason why we don't like the term endgame is because with the amount of progression that's available with the amount of diversity and player agency that impacts the world... We want the weapon system [to] add an element of that as well... You can determine special effects that proc from currently the combo system; you can determine ancillary effects that proc based on enchantment types; you can power stone weapons to add different either elemental types of damage and/or energy that play rock-paper-scissor with player defenses ... and then you can skill tree out how those effects that are granted ... you can make them better you can branch them off into a different direction.[54] – Steven Sharif
Passive skills
Passive skills are used to augment weapon usage, armor usage, health regeneration, and passive stats.[63]
- Passive skills can be levelled up by allocating skill points on the skills UI.[63]
- Passive skills enable players to work toward mastery of a weapon.[37]
- Passive skills are based on the player's choice of primary archetype.[64]
- Some passives may be introduced with the choice of secondary archetype, but this hasn't been finalized yet.[65]
- All these passive abilities: mana regen, attack damage, critical hit damage, health regeneration, defense mitigation, maximum health: A lot of different changes from the passive side of things and these are based on what archetype you've chosen.[64] – Steven Sharif
| Skill | Icon | Origin | Description |
|---|---|---|---|
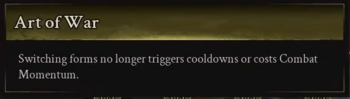
| Act of War | 
|
鬥士 | Switching forms no longer triggers cooldowns or costs Combat Momentum.[66] |
| Beam Amplifier | 
|
Wand | Wand Hit 6+ now deals 50% more damage if the previous wand combo hit was also a beam attack.[67] |
| Blade Twist | 
|
Greatsword | Adds Wound to Greatsword Combo finishers and Extended Finishers.[68] |
| Brutality | 
|
鬥士 | Weapon combo finishers and extended finishers apply 5 Wound stacks, plus an additional Wound for every 10 stacks already on the target. Each wound stack reduces target healing received by 0.5% and target damage mitigation by 0.15%, up to a maximum of 100 stacks.[69] |
| Burning Blade | 
|
Greatsword | Add Burning to Greatsword Combo finishers and Extended Finishers.[70] |
| Burning Projectiles | 
|
Wand | Every wand projectile and beam has a 10% chance to Burn the target.[ 需要引用 ] |
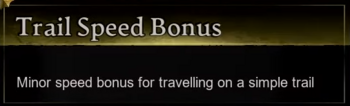
| Caravan Trail Speed Bonus | 
|
Caravan | Minor speed boost for travelling on a simple trail.[71] |
| Chilling Projectiles | 
|
Wand | Every wand projectile and beam has a 10% chance to Chill the target.[72] |
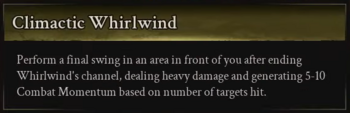
| Climactic Whirlwind | 
|
鬥士 | Perform a final swing in an area in front of you after ending Whirlwind's channel, dealing heavy damage and generating 5-10 Combat Momentum based on number of targets hit.[73] |
| Consuming Lethal Blow | 
|
鬥士 | Lethal Blow returns 50% of overkill damage dealt as health and mana.[74] |
| Echo | 
|
Wand | Adds a 25% chance to gain the Echo proc upon completion of Wand Combo Finishers & Extended Finishers. This rate increases to 100% upon beam finishers. Echo - When you strike a target with direct damage, it gets struck again for magical damage.[75] |
| Electrifying Projectiles | 
|
Wand | Every wand projectile and beam has a 10% chance to Electrify the target.[ 需要引用 ] |
| Elemental Attunement I | 
|
Wand | Increases the trigger chance of Elemental status effect wand procs by 5%.[76] |
| Elemental Attunement II | 
|
Wand | Increases the trigger chance of Elemental status effect wand procs by 5%.[ 需要引用 ] |
| Elemental Attunement III | 
|
Wand | Increases the trigger chance of Elemental status effect wand procs by 5%.[ 需要引用 ] |
| Essence Harvest | 
|
Wand | Every time you trigger a wand proc, you have a 50% chance to increase magical powerby 3% by 10 seconds. Stacks up to 5 times.[77] |
| Extended Duration I | 
|
Greatsword | Extends the duration of the Second Strike and Perfect Timing proc effects by 2.5 seconds.[78] |
| Extended Duration I (Wand) | 
|
Wand | Extends the duration of the Echo and Perfect Timing proc effects by 2.5 seconds.[ 需要引用 ] |
| Extended Duration II |
|
Greatsword | Extends the duration of the Second Strike and Perfect Timing proc effects by 2.5 seconds.[79] |
| Extended Duration II (Wand) | 
|
Wand | Extends the duration of the Echo and Perfect Timing proc effects by 2.5 seconds.[80] |
| Extended Duration III |
|
Greatsword | Extends the duration of the Second Strike and Perfect Timing proc effects by 2.5 seconds.[81] |
| Extended Duration III (Wand) | 
|
Wand | Extends the duration of the Echo and Perfect Timing proc effects by 2.5 seconds.[ 需要引用 ] |
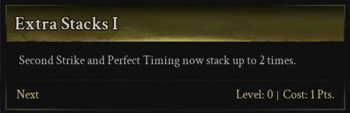
| Extra Stacks I | 
|
Greatsword | Second Strike and Perfect Timing now stack up to 2 times.[82] |
| Extra Stacks I (Wand) | 
|
Wand | Second Strike and Perfect Timing now stack up to 2 times.[ 需要引用 ] |
| Extra Stacks II (Wand) | 
|
Wand | Second Strike and Perfect Timing now stack up to 3 times.[83] |
| Extra Stacks III (Wand) | 
|
Wand | Second Strike and Perfect Timing now stack up to 4 times.[84] |
| Fuse | 
|
法師 | Your applied Burning statuses are 50% more powerful when applied to targets with Shocked.[85] |
| Greater Brutality |
|
鬥士 | Overpower and Brutal Cleave apply 10 Wound stacks to enemies hit.[86] |
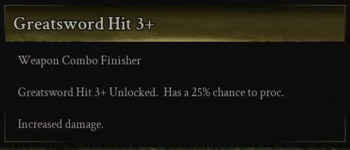
| Greatsword Hit 3+ | 
|
Greatsword | Weapon Combo Finisher. Greatsword Hit 3+ Unlocked. Has 25% chance to proc. Increased damage.[87] |
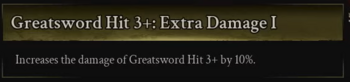
| Greatsword Hit 3+: Extra Damage I | 
|
Greatsword | Increases the damage of Greatsword Hit 3+ by 10%.[88] |
| Greatsword Hit 3+: Extra Damage II |
|
Greatsword | Increases the damage of Greatsword Hit 3+ by 10%.[89] |
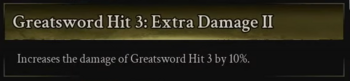
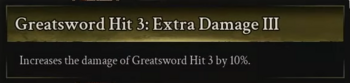
| Greatsword Hit 3+: Extra Damage III |
|
Greatsword | Increases the damage of Greatsword Hit 3+ by 10%.[90] |
| Greatsword Hit 4 | 
|
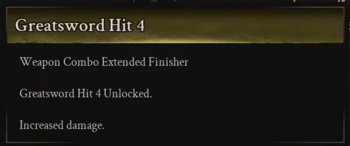
Greatsword | Weapon Combo Extended Finisher. Greatsword Hit 4 Unlocked. Increased damage.[91] |
| Greatsword Hit 4+ |
|
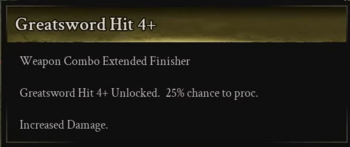
Greatsword | Weapon Combo Extended Finisher. Greatsword Hit 4+ Unlocked. 25% chance to proc. Increased damage.[92] |
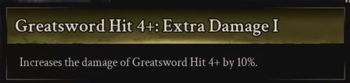
| Greatsword Hit 4+: Extra Damage I |
|
Greatsword | Increases the damage of Greatsword Hit 4 by 10%.[93] |
| Greatsword Hit 4+: Extra Damage II |
|
Greatsword | Increases the damage of Greatsword Hit 4 by 10%.[94] |
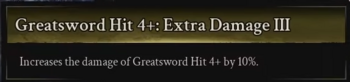
| Greatsword Hit 4+: Extra Damage III |
|
Greatsword | Increases the damage of Greatsword Hit 4 by 10%.[95] |
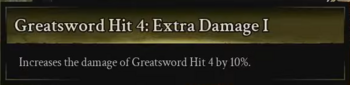
| Greatsword Hit 4: Extra Damage I |
|
Greatsword | Increases the damage of Greatsword Hit 4 by 10%.[96] |
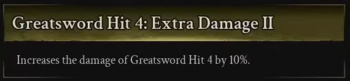
| Greatsword Hit 4: Extra Damage II |
|
Greatsword | Increases the damage of Greatsword Hit 4 by 10%.[97] |
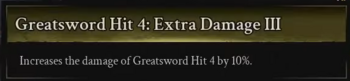
| Greatsword Hit 4: Extra Damage III |
|
Greatsword | Increases the damage of Greatsword Hit 4 by 10%.[98] |
| Guard | 
|
Greatsword | Your abilities have a 30% chance to proc Guard. Guard: Your next weapon combo finisher grants 6 seconds of temporary health equal to 1-3% of your maximum health.[99] |
| Hit 5+ Proc Chance I | 
|
Wand | Increases the base trigger chance of Hit 5+ to 50%.[100] |
| Hit 5+ Proc Chance II | 
|
Wand | Increases the base trigger chance of Hit 5+ to 75%.[101] |
| Hit 5+ Proc Chance III | 
|
Wand | Increases the base trigger chance of Hit 5+ to 100%.[102] |
| Hit 6+ Proc Chance I |
|
Wand | Increases the base trigger chance of Hit 6+ to 50%.[103] |
| Hit 6+ Proc Chance II |
|
Wand | Increases the base trigger chance of Hit 6+ to 75%.[104] |
| Hit 6+ Proc Chance III |
|
Wand | Increases the base trigger chance of Hit 6+ to 100%.[105] |
| Keen Edge | 
|
Greatsword | Your abilities have a 30% chance to proc Keen Edge. Keen Edge: Your next weapon combo finisher has +100% chance to critically hit.[106] |
| Meditative Form of the River | 
|
鬥士 | Form of the River increases your mana regeneration by 0.01% of your maximum mana per point of Combat Momentum you have.[107] |
| Overdrive |
|
鬥士 | After completing the final spin, you may continue spinning at maximum speed while rapidly depleting your Momentum. Ends after Momentum is fully depleted or after stopping the channel.[108] |
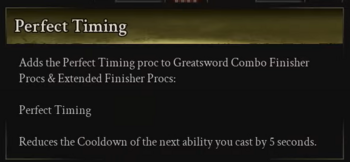
| Perfect Timing | 
|
Greatsword | Adds the Perfect Timing proc to Greatsword Combo Finisher Procs & Extended Finisher Procs: Perfect Timing Reduces the Cooldown of the next ability you cast by 5 seconds.[109] |
| Perfect Timing (Wand) | 
|
Wand | Adds a 25% chance to gain the Perfect Timing proc upon completion of Weapon Combo Finishers & Extended Finishers. This rate increases to 100% upon beam finishers. Perfect Timing - Reduces the Cooldown of the next ability you cast by 5 seconds.[110] |
| Potency I | 
|
Greatsword | Second Strike - Increases the damage of the Second Strike Proc by 25%. Perfect Timing - Increases the cooldown reset by 1 second.[111] |
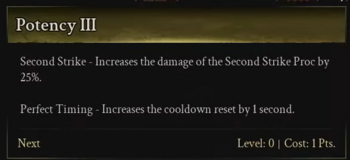
| Potency III |
|
Greatsword | Second Strike - Increases the damage of the Second Strike Proc by 25%. Perfect Timing - Increases the cooldown reset by 1 second.[112] |
| Pyromania | 
|
法師 | Upon cast completion, an additional Magma Field spawns under your character. But you also become afflicted by Burning at (500%🢆) fire damage power.[113] |
| Raging Blitz | 
|
鬥士 | Blitz generates 20 Combat Momentum.[114] |
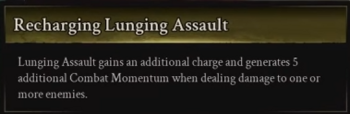
| Recharging Lunging Assault | 
|
鬥士 | Lunging Assault gains an additional charge and generates 5 additional Combat Momentum when dealing damage to one or more enemies.[115] |
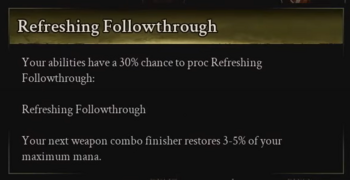
| Refreshing Followthrough | 
|
Greatsword | Your abilities have a 30% chance to proc Refreshing Followthrough. Refreshing Followthrough: Your next weapon combo finisher restores 3-5% of your maximum mana.[116] |
| Reinvigorating Exert | 
|
鬥士 | Exert additionally refreshes all ability cooldowns by 1% per point of Combat Momentum the caster has upon activation.[117] |
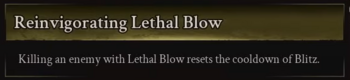
| Reinvigorating Lethal Blow |
|
鬥士 | Killing an enemy with Lethal Blow resets the cooldown of Blitz.[118] |
| Relentless Form of the Avalanche | 
|
鬥士 | Form of the Avalanche causes your weapon combo attacks to apply 3 stacks of Staggered to enemies hit, plus 1 additional stack per 30 Combat Momentum you have. Staggered reduces physical accuracy by 0.1% per stack and physical disable reduction by 1% per stack.[119] |
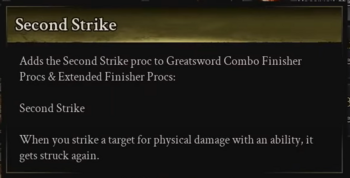
| Second Strike |
|
Greatsword | Adds Second Strike proc to Greatsword Combo Finisher Procs & Extended Finisher Procs: Second Strike When you strike a target for physical damage with an ability, it gets struck again.[120] |
| Second Strike (Wand) |
|
Wand | Adds Second Strike proc to Wand Combo Finisher Procs & Extended Finisher Procs: Second Strike When you strike a target for physical damage with an ability, it gets struck again.[ 需要引用 ] |
| Slicing Maim | 
|
鬥士 | Maim launches a piercing projectile that deals damage to enemies in its path.[121] |
| Swordmaster: Consistent I |
|
Greatsword | Adds Swordmaster: Swiftness - Increases effect duration by 0.5s. Swordmaster: Endurance - Increases minimum possible health restored by 0.5% Max HP.[122] |
| Swordmaster: Consistent II |
|
Greatsword | Adds Swordmaster: Swiftness - Increases effect duration by 0.5s. Swordmaster: Endurance - Increases minimum health restored by 0.5% Max HP.[123] |
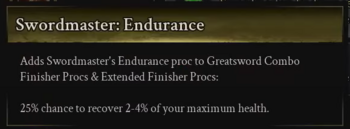
| Swordmaster: Endurance | 
|
Greatsword | Adds Swordmaster: Endurance proc to Greatsword Combo Finisher Procs & Extended Finisher Procs: 25% chance to recover 2-4% of your maximum health.[124] |
| Swordmaster: Potential I | 
|
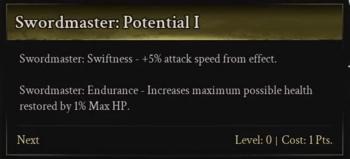
Greatsword | Adds Swordmaster: Swiftness - +5% Attack speed from effect. Swordmaster: Endurance - Increases maximum possible health restored by 1% Max HP.[125] |
| Swordmaster: Proc Rate I | 
|
Greatsword | Increases all Swordmaster effect proc rates by 25%.[126] |
| Swordmaster: Proc Rate II |
|
Greatsword | Increases all Swordmaster effect proc rates by 25%.[127] |
| Swordmaster: Proc Rate III |
|
Greatsword | Increases all Swordmaster effect proc rates by 25%.[128] |
| Swordmaster: Swiftness | 
|
Greatsword | Adds Swordmaster: Swiftness proc to Greatsword Combo Finisher Procs & Extended Finisher Procs: 25% chance to gain 25% attack speed for 1.5 seconds. Stack up to 2 times.[129] |
| Unstoppable Exert |
|
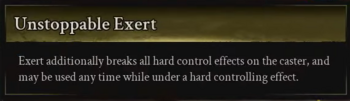
鬥士 | Exert additionally breaks all hard control effects on the caster, and may be used any time while under a hard controlling effect.[130] |
| Wand Damage Focus I | 
|
Wand | Increases the damage of all wand projectiles and beams by 5%.[ 需要引用 ] |
| Wand Damage Focus II | 
|
Wand | Increases the damage of all wand projectiles and beams by 5%.[ 需要引用 ] |
| Wand Damage Focus III | 
|
Wand | Increases the damage of all wand projectiles and beams by 5%.[131] |
| Wand Hit 5 Extra Damage I | 
|
Wand | Wand Hit 5 deals 15% more base damage.[ 需要引用 ] |
| Wand Hit 5 Extra Damage II | 
|
Wand | Wand Hit 5 deals 15% more base damage.[ 需要引用 ] |
| Wand Hit 5 Extra Damage III | 
|
Wand | Wand Hit 5 deals 15% more base damage.[ 需要引用 ] |
| Wand Hit 5+ | 
|
Wand | Wand Hit 5+ Unlocked. You have a 25% chance on the 5th hit to instead fire a beam at the target that triggers proc efffects. Triggers Weapon Finisher Effects.[132] |
| Wand Hit 5+ Extra Damage I | 
|
Wand | Wand Hit 5+ deals 15% more base damage.[ 需要引用 ] |
| Wand Hit 5+ Extra Damage II | 
|
Wand | Wand Hit 5+ deals 15% more base damage.[ 需要引用 ] |
| Wand Hit 5+ Extra Damage III | 
|
Wand | Wand Hit 5+ deals 15% more base damage.[ 需要引用 ] |
| Wand Hit 6 | 
|
Wand | Wand Hit 6 Unlocked. Triggers Weapon Finisher Effects.[133] |
| Wand Hit 6 Extra Damage I |
|
Wand | Wand Hit 6 deals 15% more base damage.[ 需要引用 ] |
| Wand Hit 6 Extra Damage II |
|
Wand | Wand Hit 6 deals 15% more base damage.[134] |
| Wand Hit 6 Extra Damage III |
|
Wand | Wand Hit 6 deals 15% more base damage.[135] |
| Wand Hit 6+ |
|
Wand | Wand Hit 6+ Unlocked. Wand Hit 6+ Unlocked. You have a 25% chance on the 6th hit to instead fire a beam at the target that triggers proc effects. Deals 50% more damage if the previous wand combo hit was also a beam attack. Triggers Weapon Finisher Effects.[136] |
| Wand Hit 6+ Extra Damage I |
|
Wand | Wand Hit 6+ deals 15% more base damage.[137] |
| Wand Hit 6+ Extra Damage II |
|
Wand | Wand Hit 6+ deals 15% more base damage.[138] |
| Wand Hit 6+ Extra Damage III |
|
Wand | Wand Hit 6+ deals 15% more base damage.[ 需要引用 ] |
| Weapon Mastery: Bows | 
|
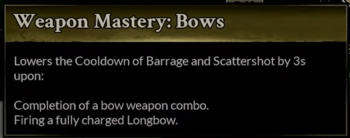
Bow | Lowers the Cooldown of Barrage and Scatter Shot by 3s upon: Completion of a bow weapon combo; Firing a fully charged Longbow.[139] |
| Weapon Proficiency I (Wand) | 
|
Wand | Increased Accuracy by 0.5%.[140] |
| Weapon Proficiency II (Wand) | 
|
Wand | Increased Accuracy by 0.5%.[141] |
| Weapon Proficiency III (Wand) | 
|
Wand | Increased Accuracy by 0.5%.[142] |
| Weapon Proficiency IV (Wand) | 
|
Wand | Increased Accuracy by 0.5%.[143] |
| Weapon Proficiency IX |
|
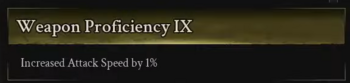
Greatsword | Increased Attack Speed by 1%.[144] |
| Weapon Proficiency V (Wand) | 
|
Wand | Increased Accuracy by 0.5%.[145] |
| Weapon Training: Deflection | 
|
Greatsword | Increases your Evasion by 0.5%.[146] |
| Weapon Training: Followthrough | 
|
Greatsword | Increases your Mitigation Penetration by 0.5%.[147] |
| Weapon Training: Power | 
|
Greatsword | Increases your Critical Damage by 0.5%.[148] |
| Weapon Training: Power (Wand) | 
|
Wand | Increases your Critical Damage by 2%.[149] |
| Weapon Training: Precision | 
|
Greatsword | Increases your Accuracy by 0.5%.[150] |
其他
引用
- ↑ 1.0 1.1 影片, 2023-12-19 (5:29).
- ↑ 2.0 2.1 2.2 直播, 2023-07-28 (1:03:27).
- ↑ 3.0 3.1 訪談, 2020-07-29 (55:44).
- ↑ 4.0 4.1 4.2 4.3 4.4 4.5 訪談, 2020-07-19 (53:59).
- ↑ 5.0 5.1 5.2 5.3 5.4 5.5 訪談, 2020-07-18 (1:07:51).
- ↑ 6.0 6.1 6.2 6.3 直播, 2017-07-28 (19:05).
- ↑ 7.0 7.1 7.2 直播, 2020-08-28 (1:19:24).
- ↑ 8.0 8.1 8.2 8.3 直播, 2023-12-19 (1:49:56).
- ↑ 9.0 9.1 9.2 9.3 直播, 2023-12-19 (1:46:12).
- ↑ 10.0 10.1 10.2 10.3 訪談, 2020-07-29 (54:44).
- ↑ Forums - Livestream Q&A 2022-08-26.
- ↑ 訪談, 2020-07-18 (1:07:06).
- ↑ 13.0 13.1 直播, 2017-11-16 (30:02).
- ↑
- ↑ 直播, 2017-10-16 (1:00:44).
- ↑ 訪談, 2018-08-08 (22:27).
- ↑ 17.0 17.1 直播, 2023-12-19 (1:20:41).
- ↑ 18.0 18.1 18.2 18.3 18.4 18.5
- ↑ 19.0 19.1 直播, 2023-07-28 (1:04:27).
- ↑ 20.0 20.1 20.2 20.3 20.4 20.5 訪談, 2020-07-18 (1:05:04).
- ↑

- ↑ 22.0 22.1 22.2 22.3 直播, 2021-11-19 (50:38).
- ↑ 影片, 2022-09-30 (17:00).
- ↑ 直播, 2021-09-24 (1:18:06).
- ↑ 直播, 2020-08-28 (1:21:03).
- ↑ 直播, 2017-05-03 (15:15).
- ↑ 27.0 27.1 直播, 2020-03-28 (1:41:42).
- ↑ 28.0 28.1 直播, 2017-05-03 (17:59).
- ↑ 直播, 2017-11-16 (30:45).
- ↑ 直播, 2017-05-19 (43:09).
- ↑ 直播, 2022-09-30 (1:20:46).
- ↑ 直播, 2020-10-30 (1:06:53).
- ↑ 33.0 33.1 Ashes of Creation class list.
- ↑

- ↑ 直播, 2017-05-03 (50:50).
- ↑ 直播, 2017-07-18 (37:43).
- ↑ 37.0 37.1 37.2 37.3 37.4 February 8, 2019 - Questions and Answers.
- ↑ 直播, 2020-07-31 (1:31:11).
- ↑ Podcast, 2021-04-11 (54:35).
- ↑ 直播, 2022-12-02 (1:05:08).
- ↑ 影片, 2024-03-29 (47:43).
- ↑ 影片, 2023-12-19 (7:26).
- ↑ 43.0 43.1 直播, 2022-10-14 (18:34).
- ↑ 44.0 44.1 直播, 2024-01-31 (5:00).
- ↑ 45.0 45.1 訪談, 2023-07-09 (1:14:09).
- ↑ 直播, 2022-12-02 (56:09).
- ↑ 47.0 47.1 47.2 直播, 2022-06-30 (1:12:38).
- ↑ 48.0 48.1 48.2 直播, 2022-09-30 (53:15).
- ↑ 49.0 49.1 49.2 直播, 2022-09-30 (43:45).
- ↑ 50.0 50.1 50.2 影片, 2022-09-30 (24:49).
- ↑ 51.0 51.1 51.2 Podcast, 2021-09-29 (47:57).
- ↑ 52.0 52.1 52.2 訪談, 2021-02-07 (49:18).
- ↑ 53.0 53.1 53.2 53.3 53.4 53.5 直播, 2020-01-30 (1:28:40).
- ↑ 54.0 54.1 54.2 54.3 54.4 54.5 54.6 直播, 2018-06-04 (1:11:19).
- ↑ 直播, 2020-02-28 (1:10:21).
- ↑ 56.0 56.1 直播, 2023-05-31 (1:12:58).
- ↑ 直播, 2022-09-30 (1:13:23).
- ↑ 直播, 2023-09-29 (1:15:47).
- ↑ 直播, 2021-04-30 (53:08).
- ↑ 訪談, 2018-10-20 (2:53:52).
- ↑ 直播, 2018-05-04 (45:37).
- ↑ 直播, 2021-06-25 (1:29:39).
- ↑ 63.0 63.1 直播, 2020-08-28 (1:12:50).
- ↑ 64.0 64.1 直播, 2021-06-25 (23:08).
- ↑ 直播, 2023-03-31 (1:30:07).
- ↑
- ↑

- ↑

- ↑

- ↑

- ↑
- ↑

- ↑
- ↑

- ↑

- ↑

- ↑

- ↑

- ↑

- ↑

- ↑

- ↑
- ↑

- ↑

- ↑

- ↑

- ↑
- ↑
- ↑
- ↑
- ↑
- ↑
- ↑
- ↑

- ↑
- ↑
- ↑
- ↑
- ↑

- ↑

- ↑

- ↑

- ↑

- ↑

- ↑

- ↑

- ↑

- ↑

- ↑
- ↑

- ↑

- ↑
- ↑

- ↑

- ↑
- ↑
- ↑

- ↑
- ↑

- ↑
- ↑

- ↑

- ↑

- ↑
- ↑
- ↑

- ↑

- ↑

- ↑

- ↑
- ↑

- ↑

- ↑

- ↑

- ↑

- ↑

- ↑

- ↑

- ↑
- ↑

- ↑

- ↑

- ↑

- ↑
- ↑

- ↑

- ↑

- ↑

- ↑

- ↑


![[14]](#cite_note-toast-keybinds-skills.png-14)
![[18]](#cite_note-progression.png-18)
![[21]](#cite_note-class_secondary.png-21)
![[34]](#cite_note-archetypeclass.png-34)
![[66]](#cite_note-Art_of_War_Skill_Tree_Description.png-66)
![[67]](#cite_note-Beam_Amplifier_Description.png-67)
![[68]](#cite_note-Blade_Twist_Weapon_Tree_Description.png-68)
![[69]](#cite_note-Brutality_Description.png-69)
![[70]](#cite_note-Burning_Blade_Weapon_Tree_Description.png-70)
![[71]](#cite_note-Trail_Speed_Bonus_Description.png-71)
![[72]](#cite_note-Chilling_Projectiles_Description.png-72)
![[73]](#cite_note-Climactic_Whirlwind_Skill_Tree_Description.png-73)
![[74]](#cite_note-Consuming_Lethal_Blow_Description.png-74)
![[75]](#cite_note-Echo_Description.png-75)
![[76]](#cite_note-Elemental_Attunement_1_Description.png-76)
![[77]](#cite_note-Essence_Harvest_Description.png-77)
![[78]](#cite_note-Extended_Duration_1_Weapon_Tree_Description.png-78)
![[79]](#cite_note-Extended_Duration_2_Weapon_Tree_Description.png-79)
![[80]](#cite_note-Extended_Duration_2_Description.png-80)
![[81]](#cite_note-Extended_Duration_3_Weapon_Tree_Description.png-81)
![[82]](#cite_note-Extra_Stacks_1_Weapon_Tree_Description.png-82)
![[83]](#cite_note-Extra_Stacks_2_Description.png-83)
![[84]](#cite_note-Extra_Stacks_3_Description.png-84)
![[85]](#cite_note-Fuse_Skill_Tree_Description.png-85)
![[86]](#cite_note-Greater_Brutality_Description.png-86)
![[87]](#cite_note-Greatsword_Hit_3.2B_Weapon_Tree_Description.png-87)
![[88]](#cite_note-Greatsword_Hit_3.2B_Extra_Damage_1_Weapon_Tree_Description.png-88)
![[89]](#cite_note-Greatsword_Hit_3_Extra_Damage_2_Weapon_Tree_Description.png-89)
![[90]](#cite_note-Greatsword_Hit_3_Extra_Damage_3_Weapon_Tree_Description.png-90)
![[91]](#cite_note-Greatsword_Hit_4_Weapon_Tree_Description.png-91)
![[92]](#cite_note-Greatsword_Hit_4.2B_Weapon_Tree_Description.png-92)
![[93]](#cite_note-Greatsword_Hit_4.2B_Extra_Damage_1_Weapon_Tree_Description.png-93)
![[94]](#cite_note-Greatsword_Hit_4.2B_Extra_Damage_2_Weapon_Tree_Description.png-94)
![[95]](#cite_note-Greatsword_Hit_4.2B_Extra_Damage_3_Weapon_Tree_Description.png-95)
![[96]](#cite_note-Greatsword_Hit_4_Extra_Damage_1_Weapon_Tree_Description.png-96)
![[97]](#cite_note-Greatsword_Hit_4_Extra_Damage_2_Weapon_Tree_Description.png-97)
![[98]](#cite_note-Greatsword_Hit_4_Extra_Damage_3_Weapon_Tree_Description.png-98)
![[99]](#cite_note-Guard_Weapon_Tree_Description.png-99)
![[100]](#cite_note-Hit_5.2B_Proc_Chance_1_Description.png-100)
![[101]](#cite_note-Hit_5.2B_Proc_Chance_2_Description.png-101)
![[102]](#cite_note-Hit_5.2B_Proc_Chance_3_Description.png-102)
![[103]](#cite_note-Hit_6.2B_Proc_Chance_1_Description.png-103)
![[104]](#cite_note-Hit_6.2B_Proc_Chance_2_Description.png-104)
![[105]](#cite_note-Hit_6.2B_Proce_Chance_3_Description.png-105)
![[106]](#cite_note-Keen_Edge_Weapon_Tree_Description.png-106)
![[107]](#cite_note-Meditative_Form_of_the_River_Skill_Tree_Description.png-107)
![[108]](#cite_note-Whirlwind_Overdrive_Skill_Tree_Description.png-108)
![[109]](#cite_note-Perfect_Timing_Weapon_Tree_Description.png-109)
![[110]](#cite_note-Perfect_Timing_Description.png-110)
![[111]](#cite_note-Potency_1_Weapon_Tree_Description.png-111)
![[112]](#cite_note-Potency_3_Weapon_Tree_Description.png-112)
![[113]](#cite_note-Pyromania_Skill_Tree_Description.png-113)
![[114]](#cite_note-Raging_Blitz_Skill_Tree_Description.png-114)
![[115]](#cite_note-Recharging_Lunging_Assault_Description.png-115)
![[116]](#cite_note-Refreshing_Followthrough_Weapon_Tree_Description.png-116)
![[117]](#cite_note-Reinvigorating_Exert_Skill_Tree_Description.png-117)
![[118]](#cite_note-Reinvigorating_Lethal_Blow_Skill_Tree_Description.png-118)
![[119]](#cite_note-Relentless_Form_of_the_Avalanche_Skill_Tree_Description.png-119)
![[120]](#cite_note-Second_Strike_Weapon_Tree_Description.png-120)
![[121]](#cite_note-Slicing_Maim_Skill_Tree_Description.png-121)
![[122]](#cite_note-Swordmaster_Consistent_1_Weapon_Tree_Description.png-122)
![[123]](#cite_note-Swordmaster_Consistent_2_Weapon_Tree_Description.png-123)
![[124]](#cite_note-Swordmaster_Endurance_Weapon_Tree_Descriptions.png-124)
![[125]](#cite_note-Swordmaster_Potential_1_Weapon_Tree_Description.png-125)
![[126]](#cite_note-Swordmaster_Proc_Rate_1_Weapon_Tree_Description.png-126)
![[127]](#cite_note-Swordmaster_Proc_Rate_2_Weapon_Tree_Description.png-127)
![[128]](#cite_note-Swordmaster_Proc_Rate_3_Weapon_Tree_Description.png-128)
![[129]](#cite_note-Swordmaster_Swiftness_Weapon_Tree_Description.png-129)
![[130]](#cite_note-Unstoppable_Exert_Skill_Tree_Description.png-130)
![[131]](#cite_note-Wand_Damage_Focus_3_Description.png-131)
![[132]](#cite_note-Wand_Hit_5.2B_Description.png-132)
![[133]](#cite_note-Wand_Hit_6_Description.png-133)
![[134]](#cite_note-Wand_Hit_6_Extra_Damage_2_Description.png-134)
![[135]](#cite_note-Wand_Hit_6_Extra_Damage_3_Description.png-135)
![[136]](#cite_note-Wand_Hit_6.2B_Description.png-136)
![[137]](#cite_note-Wand_Hit_6.2B_Extra_Damage_1_Description.png-137)
![[138]](#cite_note-Wand_Hit_6.2B_Extra_Damage_2.png-138)
![[139]](#cite_note-Weapon_Mastery_Bows_Skill_Tree_Description.png-139)
![[140]](#cite_note-Weapon_Proficiency_1_Description.png-140)
![[141]](#cite_note-Weapon_Proficiency_2_Description.png-141)
![[142]](#cite_note-Weapon_Proficiency_3_Description.png-142)
![[143]](#cite_note-Weapon_Proficiency_4_Description.png-143)
![[144]](#cite_note-Weapon_Proficiency_9_Weapon_Tree_Description.png-144)
![[145]](#cite_note-Weapon_Proficiency_5_Description.png-145)
![[146]](#cite_note-Weapon_Training_Deflection_Weapon_Tree_Description.png-146)
![[147]](#cite_note-Weapon_Training_Followthrough_Weapon_Tree_Description.png-147)
![[148]](#cite_note-Weapon_Training_Power_Weapon_Tree_Description.png-148)
![[149]](#cite_note-Weapon_Training_Power_Description.png-149)
![[150]](#cite_note-Weapon_Training_Precision_Weapon_Tree_Description.png-150)